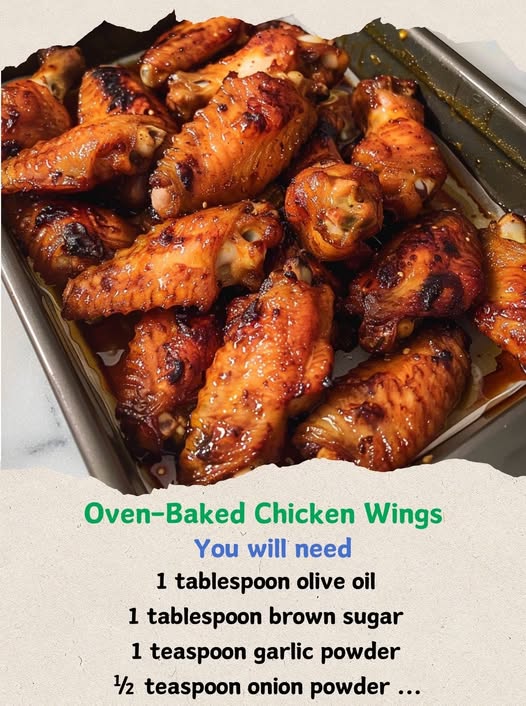
If you’re anything like me, chicken wings hold a special place in your heart. Whether it’s game day, a family dinner, or just a cozy weekend snack, there’s something about crispy, golden wings that just feels like home. Today, I’m excited to share a recipe that’s not only packed with flavor but also easy to make. These Crispy Oven-Baked Chicken Wings with Savory Dry Rub are a total game-changer – crunchy on the outside, juicy on the inside, and perfectly seasoned with a simple but incredible dry rub. They’re the perfect balance of savory, a little sweet, and just the right touch of heat.
What’s even better? These wings are baked, not fried, making them a little lighter, but still absolutely delicious. No deep fryer needed! I love how these wings come out of the oven looking perfectly crisp without having to deal with the mess of hot oil splatters. Plus, the dry rub is super easy to whip up with ingredients you probably already have in your pantry. So let’s dive into the recipe!
Getting Started: Prep and Dry Rub Magic
Before we jump into the cooking, let’s talk a little bit about the prep work. This is honestly one of the easiest parts, and with just a few simple steps, you’ll have crispy wings that rival any restaurant version. Start by gathering your ingredients. You’ll need a pound of chicken wing portions, some olive oil, and a mix of dry spices that will give your wings a delicious balance of sweet, savory, and slightly spicy notes.
Step 1: Preheat the Oven and Set Up for Success
The first step to crispy wings is setting the stage for that perfect crunch. Preheat your oven to 400°F (200°C) – this temperature is key for getting the wings golden and crispy. While the oven is heating, line a rimmed baking sheet with either aluminum foil or parchment paper. This helps with easy cleanup later, but also ensures that your wings don’t stick to the pan. Next, place a wire baking rack on top of the sheet pan. This is where the magic happens: elevating the wings off the pan allows hot air to circulate around them, helping them cook evenly and crisp up beautifully. Trust me, this makes all the difference.
Step 2: Dry the Chicken Wings
Now, grab your chicken wings. I’m using chicken wing portions because they’re perfectly sized and easy to handle. The next step is super important – drying your wings. Use a clean paper towel to pat them dry. Why is this important? Moisture on the skin will prevent it from getting crispy. So, get them as dry as possible before moving on to the next step. It might seem like a small detail, but it makes a big impact!
Step 3: Toss with Olive Oil
Once your wings are dry, it’s time to coat them in some olive oil. You only need about 1 tablespoon of olive oil for a pound of chicken wings, just enough to lightly coat them. The oil helps the seasonings stick and also promotes that crispy, golden texture when baked. In a large bowl, toss the wings in the olive oil until they’re all evenly coated.
Step 4: Mix the Savory Dry Rub
Now comes the fun part: the dry rub! This combination of spices is what gives the wings their irresistible flavor. In a separate small bowl, mix together the following ingredients:
- 1 tablespoon brown sugar – this will add a touch of sweetness that balances out the savory and spicy flavors.
- 1 teaspoon garlic powder – because garlic makes everything better, right?
- ½ teaspoon onion powder – it’s like a flavor booster for the garlic.
- ½ teaspoon ground mustard – a subtle tangy kick.
- ½ teaspoon paprika – for a little color and smokiness.
- ½ teaspoon salt – always important for bringing out the flavors.
- ¼ teaspoon chili powder – adds a bit of heat, but not too much.
- ¼ teaspoon red pepper flakes (optional) – this is where you can adjust the spice level. If you like your wings with a little more heat, toss in the red pepper flakes. If not, skip them!
Mix all these ingredients together until well combined. This dry rub is packed with flavor and will give your wings that golden-brown, perfectly seasoned crust.
Step 5: Coat the Wings with the Rub
Now that your wings are oiled up and your dry rub is ready, it’s time to bring it all together. Sprinkle the dry rub over the wings and toss them again until they’re evenly coated. Make sure every inch of the wings is covered in that delicious seasoning mixture. The combination of brown sugar, garlic, and paprika gives the wings that perfect balance of sweet, savory, and smoky flavors with just a hint of heat. Seriously, these wings are going to be packed with flavor!
Baking the Wings to Perfection
Once your wings are coated with the dry rub, it’s time to get them into the oven. Place the wings skin side up on the wire rack, and slide them into the preheated oven. Bake for 20 minutes, then carefully flip the wings over and bake for an additional 15 minutes. This two-step process ensures that the wings get nice and crispy on both sides. I promise, these are going to be the crispiest, juiciest wings you’ve ever tasted, all without any deep-frying involved.
Step 6: Baking Your Wings to Crispy Perfection
By now, your wings should be ready for their time in the oven. After the initial 20 minutes of baking, it’s time to flip them. I know it’s tempting to just leave them in, but flipping them halfway through helps them crisp up evenly on both sides. This is the trick to getting that golden, crispy exterior while keeping the inside juicy and tender.
Here’s the key: flip the wings gently so the skin doesn’t tear. I like to use tongs for this step—easy to grab the wing without disrupting the coating. Once flipped, pop them back into the oven and let them bake for another 15 minutes. This final stage ensures that the wings crisp up perfectly, giving you that mouthwatering crunch with every bite.
Step 7: The Perfect Serve – What to Pair With Your Wings
Now, your wings are done! The skin should be crispy and golden brown, and the dry rub will have infused the wings with deep, savory flavors. But what’s a great wing without a dipping sauce? You can’t go wrong with the classic options: ranch dressing or blue cheese dressing. The creamy dip contrasts perfectly with the crunchy, spiced wings, and it’s a match made in heaven.
Pro Tip: For an extra zing, you can drizzle a bit of hot sauce or buffalo sauce on the wings right before serving. If you’re someone who likes their wings extra spicy, feel free to kick up the heat with more chili flakes or your favorite hot sauce.
Step 8: Let’s Talk Variations
One of the best things about this recipe is how versatile it is. While the dry rub I’ve shared is absolutely perfect, you can easily play around with it to suit your taste. Here are a few fun variations:
- Add a little honey: If you like sweet and spicy flavors, try drizzling a little honey over the wings in the last few minutes of baking. This will give them a nice glaze and extra sweetness that balances out the heat.
- Citrus twist: For a zesty kick, squeeze fresh lime or lemon juice over the wings just before serving. The citrus will brighten up the savory flavors and add a refreshing note.
- Asian-inspired wings: Swap the paprika and chili powder for five-spice powder, and add a splash of soy sauce and a little sesame oil. These changes will give your wings an Asian-inspired twist that’s just as delicious!
- Smoked wings: If you have a smoker or want to add some smoky depth to your wings, you can substitute regular paprika for smoked paprika. This will infuse the wings with a rich, smoky flavor that pairs perfectly with the spices.
Feel free to get creative! The dry rub is super flexible, and you can adjust it to match whatever flavor profile you’re craving.
Step 9: How to Store and Reheat Leftovers
Okay, I know it’s hard to imagine having leftovers when these wings are so tasty, but let’s be real — sometimes, there’s just not enough room to devour an entire batch! If you do find yourself with some leftover wings, don’t worry! You can easily store them and enjoy them later.
- To store: Place the cooled wings in an airtight container and refrigerate for up to 3 days.
- To reheat: The best way to bring back the crispiness is to reheat the wings in the oven. Preheat your oven to 400°F (200°C), and place the wings on a wire rack on a baking sheet. Bake for about 10-12 minutes, or until they’re heated through and crispy again.
This method is far better than microwaving because it keeps the wings crispy on the outside and moist on the inside. Trust me, you’ll be glad you took the extra step.
Helpful Tips for Perfect Wings Every Time :
Here are a few bonus tips to help you get the absolute best out of your crispy oven-baked chicken wings:
- Pat the wings dry: This step can’t be stressed enough! Moisture is the enemy of crispiness. Make sure your wings are nice and dry before you start.
- Use a wire rack: The wire rack elevates the wings, ensuring hot air circulates around them and makes them crispy all over. Don’t skip this step!
- Don’t overcrowd the wings: When you lay your wings on the wire rack, make sure they’re spaced out and not touching each other. If they’re overcrowded, they’ll steam instead of crisp up, and we want that crispy skin!
- Check the temperature: If you have a meat thermometer, the internal temperature of the chicken should reach 165°F (74°C). This ensures that the wings are fully cooked and safe to eat.
- Double the batch: These wings are so good, you’ll want more! Feel free to double or triple the recipe if you’re serving a crowd. Just make sure to adjust your baking time if you’re cooking a larger batch.
Subscribe to cookingfamilyrecipes!
Get updates on the latest posts and more from cookingfamilyrecipes straight to your inbox.SubscribeI consent to receiving emails and personalized ads.
FAQ and Conclusion – Everything You Need to Know About Crispy Oven-Baked Chicken Wings
I hope by now you’re already drooling at the thought of biting into these crispy oven-baked chicken wings! But I know sometimes when you’re trying a new recipe, you might have a few lingering questions or concerns. Don’t worry — I’ve got you covered! Let’s dive into some Frequently Asked Questions (FAQs) to help you master this recipe and ensure your wings turn out perfect every time.
1. Can I make these wings ahead of time?
Yes! These wings are actually a great make-ahead option. If you want to prep them in advance, follow the instructions up until the point where you’re ready to bake them. Once you’ve coated the wings in oil and dry rub, you can store them in an airtight container or a resealable bag in the refrigerator for up to 24 hours. When you’re ready to bake, just pop them in the oven as usual. They’ll still turn out crispy and delicious!
2. What can I use if I don’t have a wire rack?
No wire rack? No problem! While the wire rack helps achieve extra crispy wings by allowing hot air to circulate around them, you can still bake them directly on the lined baking sheet. Just make sure to flip the wings halfway through cooking so they crisp up evenly. For an added crispy touch, you could also place them on a cooling rack (the kind you use for baked goods) if you have one!
3. Can I use frozen chicken wings for this recipe?
Absolutely! If you’re starting with frozen wings, you’ll need to thaw them first. Simply place them in the refrigerator overnight or thaw them in a bowl of cold water. Once thawed, pat them dry with paper towels, then follow the rest of the recipe as usual. Important tip: Thawing the wings completely before baking is crucial for getting that crispy texture.
4. How can I make the wings spicier?
If you love a good kick of heat, there are plenty of ways to spice up these wings! Add more red pepper flakes to the dry rub, or swap out the paprika for cayenne pepper. If you’re looking for even more spice, drizzle some buffalo sauce or your favorite hot sauce over the wings before serving. For an extra punch, serve them alongside a spicy dipping sauce.
5. Why are my wings not crispy?
If your wings aren’t as crispy as you’d like, it could be because there’s too much moisture. Here are a couple of things to check:
- Dry the wings well: Moisture is the enemy of crispiness, so make sure you pat the wings dry before you oil them.
- Don’t overcrowd the pan: If the wings are too close together on the baking sheet, they’ll steam rather than crisp up. Make sure there’s enough space between each wing.
- Use a wire rack: If you’re not using a wire rack, you’ll miss out on that crucial air circulation that helps with crispiness. If you don’t have one, consider investing in one — it makes a world of difference!
6. Can I double the recipe?
Definitely! If you’re serving a crowd or just want to make a bigger batch, you can easily double or even triple this recipe. Just make sure to not overcrowd the baking sheet, and if needed, cook the wings in batches. Adjust the cooking time slightly if you’re baking more wings, and check for that perfect crispy texture.
7. What should I serve these wings with?
These crispy wings are perfect on their own, but if you’re looking to make a full meal, there are plenty of sides that pair wonderfully. Here are a few ideas:
- Coleslaw: The creamy crunch is a great contrast to the spicy wings.
- Potato wedges: Crispy, golden, and a perfect side to complement the wings.
- Celery and carrot sticks: A fresh and crunchy side to cool down the heat from the wings.
- Corn on the cob: Sweet corn is always a hit with savory, spiced wings.
Conclusion: Time to Dig In!
And there you have it — crispy oven-baked chicken wings that are easy to make, full of flavor, and perfect for any occasion. Whether you’re hosting a party, watching the game, or just craving a delicious snack, these wings will definitely steal the show. The best part? You don’t even need a deep fryer to achieve that crispy, golden texture. The simple dry rub packs in so much flavor, and with the right baking techniques, you’ll have wings that taste like they’ve been fried — without the mess or extra calories!
I hope you’re feeling inspired to get in the kitchen and try these wings for yourself. If you do, I’d love to hear how they turn out! Don’t forget to share any creative variations you come up with — maybe you add a little extra spice or try a different dipping sauce. Whatever you do, enjoy the process, have fun, and share the love (and wings) with friends and family.
So, what are you waiting for? Grab your ingredients, preheat the oven, and let’s get cooking. Happy wing-making!

